
Figuring out how to charge your EverStart jump starter might seem tricky at first, but it’s straightforward once you know the steps.
Getting the right process ensures your device stays ready for use and lasts longer.
By the end of this guide, you’ll know how to safely and correctly charge your jump starter, so you’re always prepared to jump-start your vehicle when needed.
Keep reading to learn the simple, step-by-step process.
Prepare Your Jump Starter for Safe Charging
Before plugging in your jump starter, perform a quick visual inspection to ensure it’s safe to charge. Check the case for cracks, swelling, or leaks—never charge a damaged unit. Make sure the charging port is clean, dry, and free of debris. Confirm that the battery indicator lights are functioning properly. If you notice a burning smell, see liquid residue, or feel unusual warmth, stop immediately. These safety steps help prevent electrical shocks and fire hazards.
Choose a dry, well-ventilated location away from flammable materials. Avoid damp areas and ensure your hands are completely dry before handling the device. Keep airflow clear around the jump starter to prevent overheating, and restrict access to children and pets. Never charge in water or wet environments, and do not use the device if the battery appears frozen. Always disconnect the charger before cleaning the unit. When routing cables, ensure they are not pinched or stressed to avoid damage. Monitor the temperature during charging; if the device becomes excessively hot, disconnect it immediately. Always route the charging cable away from moving engine parts to prevent accidental short circuits or wear. Recheck everything before your next use to ensure safe operation. For optimal longevity, always store the unit in a cool, dry place to prevent fuel degradation and other chemical breakdowns that can harm internal components. Using a surge protector during charging can also safeguard the device from sudden power spikes.
Identify Your Charger Type (AC Adapter, 12V, or USB)
Determine your charger type by checking your jump starter’s input port and the included accessories. Most EverStart units come with an AC wall adapter compatible with standard 120V outlets. For smaller models, a 12V DC car charger at 2A is common, especially for portable units. Newer models often feature USB or USB-C inputs, allowing for faster recharging via portable power banks. When selecting a power source, consider using a portable generator inverter for reliable AC output during extended travel. Always operate generators outdoors to prevent carbon monoxide buildup when using any portable power source. The correct plug type is usually labeled near the input port, indicating whether it accepts barrel connectors for AC or DC power, or micro-USB/USB-C for USB charging. For EverStart Maxx models, the compatible AC adapter uses a barrel type connector supporting 1A output at 12V. Remember, do not use jump-start clamps for charging; they are meant only for cranking your vehicle, not for power inputs. Matching your adapter to the proper port ensures safe, efficient recharging tailored to your specific model. To avoid overcharging, periodically monitor voltage with a multimeter as part of routine deep cycle battery maintenance.

[Compatible Models] Charger compatible with EverStart maxx J7CCE J7CE max 800A 800 peak amps battery jump starter with 120 PSI air compressor car jump starter

Specification: Input: AC 100V-240Volt 50/60HZ Output: DC 12V 1A Power cord: 5FT/1.5M Jack:5.5*2.1

Compatibility-- 12V 1A charger compatibles with EverStart maxx J7CCE J7CE max 800A 800 peak amps battery jump starter with 120 PSI air compressor car jump starter
The Correct Order to Plug Everything In
To ensure safe and effective charging, always plug the charger into the EverStart jump starter first, then connect it to the power source. Begin with the unit turned off and the charging port exposed. Insert the barrel connector or Micro-USB end securely into the jump starter’s input port—not the jump-start socket. Only after this connection should you plug the adapter into a standard AC outlet, 12V accessory port, or a live USB port. This sequence minimizes the risk of arcing and prevents exposed live contacts, protecting your battery’s safety. Once connected properly, charging indicators will activate to confirm power flow. When unplugging, reverse the order: first disconnect from the power source, then remove the cable from the jump starter. Following this consistent procedure across all EverStart models helps ensure reliable and safe charging every time. Just as you should avoid running a generator indoors to prevent carbon monoxide poisoning, never charge a jump starter in a sealed or poorly ventilated area. As with fuel conversions, following the exact order of steps prevents system damage and safety hazards. For comparison, home solar battery systems like the Tesla Powerwall use a similar charging sequence to prevent electrical hazards during setup.
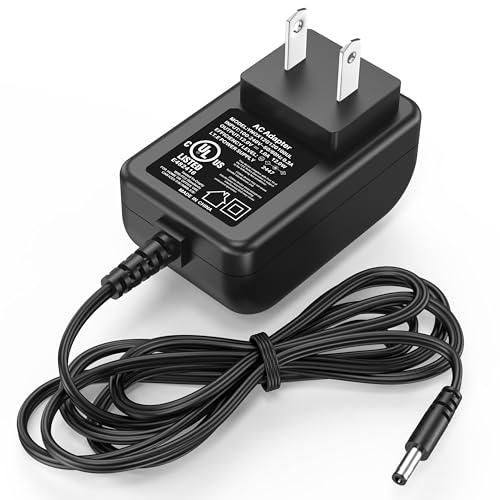
Compatible Models for EverStart Charger: The replacement charger for EverStart Maxx car jump starter is only compatible with EverStart Maxx J7CCE J7CE J7-CCE J7-CE Ever Start max 800 Peak Amp 800A camo car battery charger jump starter portable with 120 PSI air compressor pivoting LED light and 3 USB ports 12VDC DC12V 12.0 V volt DC 12 volts DC power supply cord charger. (ONLY for the models listed above) Pls double check before order

Compatibility:DC 12V 1A charger compatibles with EverStart maxx J7CCE J7CE J7-CCE J7-CE Ever Start max 800A 800 peak amps battery jump starter with 120 PSI air compressor car jump starter

This AC to DC power cord is designed to work with EverStart MAXX 1200 Peak AMPS Jump Starter with Air Compressor and Inverter Ever Start 1200A 750A 12V 300A JumpStarter Box Lot 11480. Please check the model number of your device before purchasing.
How to Read the Charging Lights on Your Jump Starter
When you connect your EverStart jump starter to a power source, the charging lights provide a clear indication of the battery’s status. A blinking red light means the battery is deeply discharged and just beginning to charge. A solid red light indicates that charging is actively happening. When the light is blinking green, the battery is nearly full, with the charger slowing down the charge rate to protect the battery’s lifespan. A solid green light signals that the battery is fully charged and ready to unplug. For safety, remember that the jump starter uses a Deep Cycle AGM battery design, which requires a slower, controlled charge to prevent damage. This slower charging approach is similar to how whole home surge protectors regulate power flow to safeguard connected equipment. To ensure safe connection, always attach the positive clamp before the negative terminal when using a lead-acid charger.
Always ensure that you match the light patterns to your model’s manual, as indicator designs can vary. Some units show battery status with bars—25%, 50%, 75%, and four solid bars at full charge. Red always signifies charging, while green indicates a near-full or full battery. Don’t rely solely on a single blink; verify with a solid green light or full bars. Keep in mind that a backlit screen may time out, so recheck if no lights are visible. Use these indicator behaviors as your guide to ensure your jump starter is safely and completely charged.
Jump Starter Charge Times and Safe Post-Charging Steps
The appropriate charge time depends on your jump starter model. Basic EverStart units typically need 3 to 6 hours of charging, while Maxx models generally require 4 to 6 hours. For larger units like the 1200A-class, expect 14 to 16 hours of charging from empty when using a 1-amp adapter. First-time charging often takes between 20 and 24 hours, and it’s important not to skip or rush this process. Using a higher-output adapter can help speed up charging, but always ensure the charger is compatible with your unit’s specifications. After each jump-start, recharge the battery to maintain optimal performance and longevity. Always unplug the charger from the wall before removing the cable from your jump starter. Turn off the power switch, keep the starter upright, and store it in a cool, dry place. Recharging every 30 days prevents the battery from becoming permanently damaged, and you should avoid letting the battery sit fully discharged. Remember that a surge protector can help safeguard your charger and device from voltage spikes during the charging process. Unlike a portable jump starter, a whole house generator can run for days on a continuous fuel supply, but it requires regular maintenance intervals to prevent mechanical failure. For jump starter safety, always verify that the charging adapter matches the unit’s voltage to avoid overheating the internal battery.

15v jump starter charger DC Plug Size: 5.5x2.1mm tip (inside"+", outside"-") Input:100-240V 50-60Hz . DC Output: 15V 1A

【charger compatible with everstart jump starter 】 Input: AC 100V-240V; Output: DC 12V; Power cord length: 1.8M. This charger has been tested with everstart maxx jump starter, It is an excellent replacement for original charger.


