Struggling with a glugging or uneven pour from your gas can? That’s usually caused by a simple venting issue.
By adding a small vent hole and a few affordable parts, you can fix it for less than $10 and get a smooth, drip-free flow.
Keep reading to see how you can easily build your own gas can vent the right way.
Why Your Gas Can Pours Like a Snail (And How a DIY Vent Fixes It)
Adding a DIY vent is a straightforward fix that can dramatically improve your gas can’s pouring performance. First, select a small drill bit, around 1/8 inch in diameter, to make a hole above the fill line of the can. This location is crucial because it prevents fuel from spilling out when you tilt the can during pouring. Drill carefully to avoid cracking the plastic and wear eye protection. Next, install a small vent assembly or a rubber grommet into the hole to allow air to enter as fuel exits. This prevents vacuum formation inside the can, enabling a smooth, continuous pour. The key is to ensure the vent provides a dedicated airflow path, which eliminates glugging and reduces spills. A properly functioning vent also extends the lifespan of your equipment by reducing strain on the container, similar to how routine load testing identifies battery weakness before failure. With this simple adjustment, your gas can will pour like a steady stream instead of a water faucet on a drip. Placing the vent on the side of the handle allows you to use your thumb for instant flow control, covering it to slow the pour or uncovering it to increase speed without spillage. For those comparing backup power systems, note that inverter generators often require similar smooth fuel delivery to maintain consistent performance. For example, understanding the precise oil capacity of a generator ensures you avoid overfilling and maintain proper lubrication during operation.

【Faster Flowing】:The upgraded gas tank vent caps can turn the gas container into vented gas can to make it have an equal air pressure for constant flow. Our gas tank exhaust caps kit can make sure your fuel gas can more smoother and faster flowing to save your time.

Practical & Convenient Set: Get ready for practicality and convenience with this set of 5 yellow gas can vent caps. Made from lightweight yet durable plastic, they are built for long-lasting use.

Material: The exhaust cover for the air storage tank is crafted from premium materials. It features a wider and thicker seal that fits the cover more snugly, providing high reliability, safety, durability, and an extended service life.
The 4 Cheap Parts You Need for This Fix
You’ll need four inexpensive parts to fix your gas can vent. First, get a small fuel-tank vent valve, which handles pressure regulation and ensures fuel vapor safety by preventing liquid escape. Second, choose a vent hose—either 5/16-inch or 5/8-inch in diameter—that matches the barb size of your valve; mismatched sizes will restrict airflow and compromise venting. Third, select a threaded adapter or fitting compatible with your container, whether metal or plastic, to secure the vent in place. Finally, include a fuel-resistant seal such as an O-ring or grommet to prevent vapor leaks and maintain a tight, safe system. These parts are low-cost, readily available at auto-parts stores or online, and they provide an effective venting solution without the need for custom machining.

The package includes: 1 x remote mount vent valve w/fuel line kit, the size of the product is subject to the picture, contains all the accessories shown in the picture

[Package] Includes 1 pack adpter, 1/2" NPTF male thread, only for NPTF thread. Check the part when receiving.
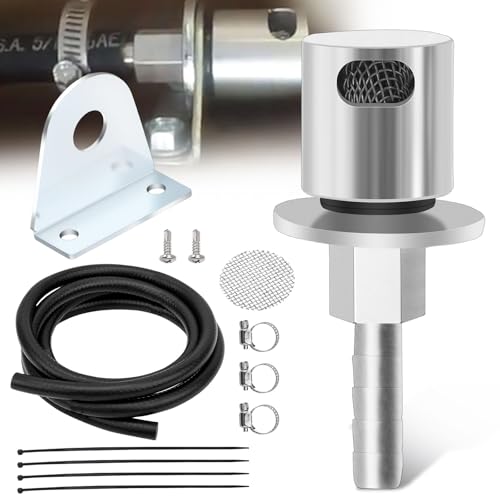
Remote Mounting: The Vent Valve Is Designed To Be Easily Mounted Remotely On The Tank For Easy Access And Maintenance. Tank Vent Valve Replacement Parts. Kit Is Detachable As Shown
Where to Drill Your Gas Can Vent for Best Flow
Drill your gas can vent near the top of the container, on a flat section above the fuel line and away from seams or ridges. This high placement prevents liquid fuel from reaching the opening during pouring or tipping, ensuring only air flows in. Choose a flat area to make sealing easier, as the vent hardware will seat properly without gaps. Avoid seams or split lines, which can compromise the seal and cause leaks. The best spot is typically on the handle side, in the upper section where it remains accessible and stays above the fuel level. Match your vent location to your can’s shape, aiming for the highest flat surface away from ribs or details. Proper vent placement prevents glugging during pouring, while a good seal avoids spills. Drilling smartly in the right spot ensures a smooth and trouble-free flow of fuel. Positioning the vent correctly minimizes stress points and potential damage by avoiding seams or rounded handles. An inverter for portable generator relies on similar careful placement to ensure stable airflow and prevent fuel system issues. For larger fuel storage, understanding 100 lb propane tank how many gallons helps ensure you have sufficient capacity for extended generator runtime. Always follow safe propane handling practices to avoid leaks or pressure buildup when working with vented fuel containers.

【PERFECT FIT, EXTRA-LONG SPOUT FOR EASIER POURING】: The KILWANI upgraded gas can spout replacement is compatible with most 1/2/5/10-gallon plastic gas cans, fitting oil jug mouth sizes ranging from 1.7 to 1.82 inches. The extended 8.1-inch gas can nozzle length ensures greater convenience and pouring flexibility.

Gas Can Spout Replacement: The upgraded gas tank nozzle kit is more compatible. Gas can mouth sizes from 1.7in-1.82in both can be used, For most 1/2/5/6/10 gallon oil can (Please measure your oil cans mouth size before purchasing) The overall length of the nozzle tube is 8.1 in, which is more convenient and flexible to use

Gas Can Spout Replacement Kits: The upgraded gas tank nozzle kit is more compatible, for most 1/2/5/10 gallon oil can. These gas can spout kits are made of high quality yellow HDPE material, The overall length of the nozzle tube is 8.1 in, which is more convenient and flexible to use, In use you can bend freely without breaking
Drill and Install Your Vent Without Sparks or Leaks
Drilling into a gas can be done safely if you follow the right steps. First, completely empty the container and take it outdoors to prevent the buildup of hazardous vapors. Remove any fuel residue and vapors before starting. Keep your tools and drill bits clean and dry to minimize ignition risks. Use a sharp drill bit and drill slowly with light pressure to reduce sparks and melting. A battery load tester works by applying a simulated load to a battery, measuring its voltage drop to assess overall battery health and performance. Stop immediately if you notice smoke, melting, or sparks. After drilling, invert the can to let shavings fall out, then shake it to remove loose chips. Inspect the drilled hole for burrs and wipe it clean. Insert the vent into a hole sized for a snug, mechanical fit. If sealant is needed, choose only fuel-resistant material. Seat the vent flush against the container surface and check for gaps before refueling. For trucks running power accessories, a compatible top power inverter ensures reliable energy conversion during long hauls. This vent cap design prevents glugging and airlocks during fuel transfer, ensuring a smooth pour. For extended trips, pairing your setup with a deep cycle battery will keep your electrical systems running efficiently.

Premium Material: Universal gas can vent cap is made of high-quality ethanol resistant rubber and brass coated galvanized material, rustproof and durable

Leak Proof Design: Universal gas can vent cap is made of stainless steel screw caps and double rubber sealing ring design, which is rust proof and durable, and will not pop out due to temperature change like plastic, resulting in gas evaporation.

【Replacement Part Number】621501-10
How to Test Your Gas Can Vent for Leaks
To test your gas can vent for leaks, start by ensuring the can is completely empty and placed in a controlled, well-ventilated area. Create a soap-and-water solution using one-third dish soap and two-thirds water. Apply this mixture to the vent seat, joints, and connections. Watch closely for bubbles forming—these indicate a leak. For a more thorough check, seal the can and introduce inert gas at low pressure, then monitor the pressure over time. A pressure drop signals a leak. Using a high-quality 10W-30 oil in your generator helps ensure reliable operation when stored with a functioning fuel system. Additionally, investing in a durable outdoor extension cord cover helps protect your power connections from moisture and debris when running tools outside.
You can also listen for hissing sounds or smell for vapor leaks during gentle pressure checks. Confirm that the vent opens and closes smoothly without sticking or resistance. If no bubbles appear, there is no pressure loss, and no odors are detected, then your vent is leak-free. If you find a leak, tighten or reseat the vent, then repeat the tests. Skipping this step can be risky, as it’s your last chance to catch issues before handling fuel. Using a fuel stabilizer can also help prevent varnish buildup in your generator during long-term storage.
Common Mistakes That Ruin a Gas Can Vent (And How to Avoid Them)
To avoid ruining your gas can vent, follow these key steps. First, choose a flat, high spot on the can for installation, ensuring the vent stays above the fuel level during pouring. Do not drill across a seam or too close to the bottom; a proper placement prevents leaks and ensures safe venting. Use a step drill bit instead of a twist bit to make a snug, clean hole—twist bits can tear plastic, leading to weak points. Always clear away plastic shavings afterward, as debris can clog the vent or cause fuel contamination. Install an automatic-closing vent that seals during storage, meeting EPA requirements, rather than a manual vent that stays open. Check material compatibility between the vent cap, gasket, and your can; incompatible materials may degrade quickly when exposed to fuel, causing leaks or failures. These steps help prevent vapor leaks, ensure safe operation, and prolong the life of your vent system. A proper vent prevents vacuum formation when gas is poured out, accommodating expanding air as the can heats up. For generator owners, keeping spare fuel in a properly vented can ensures you can easily refill the tank during extended use.