Figuring out how to refill a propane tank safely can be tricky if you’re unsure where to start. The key is knowing what to check—like dents or rust—and understanding the proper process to avoid hazards.
When done right, you’ll fill your tank efficiently and without risking damage or leaks.
By the end of this guide, you’ll be able to confidently and safely fill your propane tank, following all essential steps.
Let’s walk through each part to ensure you get it done right the first time.
Is Your Propane Tank Safe to Fill? How to Inspect for Damage
Inspecting a propane tank for damage before filling it is crucial for safety. Examine the entire cylinder carefully. If you notice any dents, bulges, cuts, or cracks, do not fill the tank. Physical damage, fire, or heat marks are clear indicators to reject the tank. Pay close attention to the weld seams; any issues there mean the tank isn’t safe. Rust and corrosion are major warning signs, especially near the bottom where moisture tends to collect. Deep, flaky, or pitted rust compromises the metal’s integrity and signals that the tank is weakened. Avoid filling any tank with visible exterior damage or corrosion. Never top off a damaged tank, as it increases the risk of failure. If the tank fails your inspection, tag it and remove it from service. Have it repaired, requalified, or rebuilt at an authorized facility before considering refilling. For consistent power supply backup, you should also consider how a generator’s performance and value affect your home setup. This inspection process is similar to checking for battery degradation using a multimeter to assess capacity loss. Unlike kerosene, which can degrade over time and should be checked for expiration and contamination, propane remains stable indefinitely if stored properly. A thorough visual check is your best defense against potential hazards.

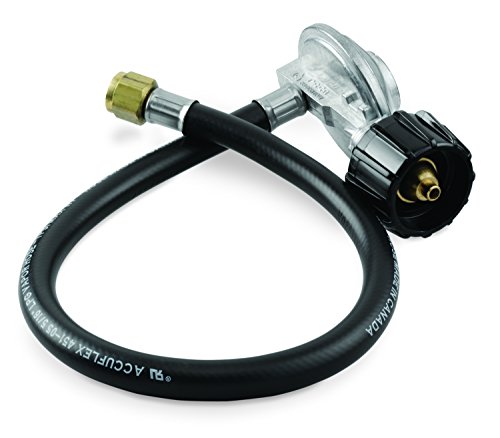
The Weber Hose and Regulator provides a secure, airtight connection between your grill and tank while controlling the flow of propane to the burners.

【Cost-Saving Propane Refill Kit】: This propane refill adapter serves as a 20lb to 1lb converter, allowing you to refill small 1 lb propane bottles from a standard 20 lb QCC1/Type1 propane cylinder, helping you cut costs on disposable canisters for camping, RV trips and outdoor cooking
How to Identify an OPD Valve Before Filling
You can identify an OPD valve before filling by inspecting the handwheel and markings. The most immediate visual cue is the handwheel shape: an OPD valve typically features a triangular or trilobular handwheel, which is distinct from the traditional round style. This unique shape helps you quickly distinguish it. A solar charger for your car battery is a useful companion device to maintain power while camping, but for propane safety, return focus to the valve checks.
Next, look for valve markings stamped directly on the handwheel or valve body; these will usually read “OPD.” If the markings are faint, worn, or missing, don’t rely solely on that. Instead, verify the label on the cylinder’s wrapper or warning tag**—it should clearly state whether the tank is equipped with an OPD. For generators that run on propane, selecting the right 10W-30 oil** ensures smooth engine lubrication and reduces wear during extended operation.
Performing both checks—handwheel shape plus markings or label—ensures the cylinder is compliant for filling. Always verify these indicators before connecting a filling hose. Remember, particularly for tanks in the 4- to 40-pound range, if it does not have an OPD, it’s not approved for filling. There are no exceptions, so confirm the identification carefully each time. Just as you would select a compatible inverter for a portable generator to ensure safe and efficient operation, confirming the OPD valve is the critical first step for safe propane filling.

Replacement OPD valve for a standard steel 30LB propane cylinder

NEVER RUN OUT OF PROPANE: Our built-in gas meter gauge provides accurate gas level readings so you don’t have to worry about running out of propane!

This adapter allows you to use your larger propane tank with the new style regulator on the propane tank connection place.
Check Your Propane Tank Valve for Wear Before Filling
Before filling a propane tank, always inspect the valve assembly for visible damage. Look for dents, rust, or corrosion around the valve and fittings, as these can compromise safety. Check the threads for wear, stripping, or damage; worn threads prevent a proper seal and mean the tank cannot be safely filled. Examine seals, O-rings, and the pressure relief valve for signs of corrosion or damage. If any component appears bent, loose, or compromised, reject the tank rather than risk leaks or failure. Similarly, ensure your equipment is compatible with the fuel source, as natural gas generators have specific safety considerations for propane conversion. Choosing a high-quality propane tank from a reputable brand helps ensure durable valve construction and reliable performance.
Ensure the opening is clear of dirt, ice, or debris before attempting to fill. Forcing a fill through a contaminated opening can cause leaks or damage. Valve lubrication and overall condition also influence safe closure, so always follow your valve manufacturer’s guidance for maintenance and inspection. If you find any faulty parts during your check, replace the defective valve through a certified supplier and remove the tank from service until repairs are completed. Proper inspection prevents leaks and hazards, ensuring the valve is fully serviceable before filling. This attention to valve integrity is similarly important when checking engine oil levels for equipment like the Predator 3500 generator.

Built to Last – Solid Brass Construction:This YFLWGFDA 100LB propane tank service valve coupler is crafted from a single piece of forged brass for unbeatable strength and durability. It won’t rust, wear out, or leak—perfect for long-term outdoor use. Whether you're powering a grill, heater, or other propane appliances, it delivers safe, steady performance every time.

Propane Tank Valve Built to Last - Solid Brass With Automatic Pressure Relief Valve & Heavy-Duty Handle: 100LB propane tank service valve coupler is forged from one solid piece of brass for superior strength and durability.Rust-resistant and leak-resistant,it’s built for tough outdoor use.The automatic pressure relief valve adds extra safety,while the heavy-duty easy-grip handle ensures smooth operation. Delivers safe,steady performance for grills,heaters,and other propane appliances.

Replacement service valve for forklift tanks
Gloves, Eye Protection, and a Clear Fill Area
Before filling a propane tank, you must wear safety glasses or goggles and gloves. Eye protection is essential because liquid propane splashes or venting can cause immediate severe cold injuries to your eyes. Use cold-resistant, propane-proof gloves rather than ordinary work gloves to protect your hands from freezer burn. Wearing long sleeves further shields your skin from contact with propane or cold burns. Adding fuel stabilizer to a tank before filling can help maintain fuel quality and prevent moisture buildup.
After gearing up, ensure the fill area is clear of clutter and hazards. You must work outdoors, away from all ignition sources, keeping flames, sparks, and pilot lights at least 25 feet away. Clearing the space allows easy access to the cylinder and hose, reducing trip risks and enhancing visibility of valves and connection points. Position your face and body away from vent points to minimize exposure during propane transfer.

Industrial Grade Protection - MELASA protective goggles meet ANSI Z87.1 Safety Goggles Standards and CE EN166 certificate requirements, designed for industrial, commercial, and housework.

Specially designed chem goggles for laboratories.
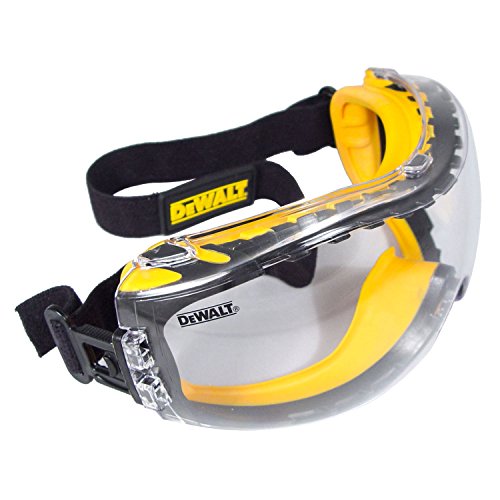
DEWALT ToughCoat hard coated lens provides tough protection against scratches.
Step-by-Step: Connecting the Hose to Your Propane Tank
Ensure the tank valve is fully closed before connecting the hose. Verify that the fitting matches your cylinder’s valve type—POL fittings have internal left-hand threads, while QCC Type 1 fittings have external right-hand threads. Align the connector straight to prevent cross-threading. For POL fittings, screw the fitting into the internal valve threads and tighten with a wrench to create a secure metal-to-metal seal. For QCC fittings, hand-tighten the connector onto the external threads; no wrench is needed. If your valve uses an older POL connection, use a POL-to-QCC adapter for compatibility. The fitting should turn smoothly; resistance indicates misalignment or incompatible threading. This adapter is crafted from solid brass to resist corrosion and ensure a durable, airtight connection in demanding conditions. Always remove protective caps before making the connection. After securing the hose, do not open the gas valve yet—perform a leak check first to ensure safety. To check how much propane remains, you can pour hot water down the side of the tank and feel for a temperature change, indicating the gas level. Similar to routine generator maintenance, you should regularly inspect the hose for cracks or wear to prevent gas leaks and ensure safe operation.

Fits QCC/Type1 & POL Connections; made of 100% brass ensuring long lifetime and durability

Converts POL LP Tanks to QCC Type1 hoses and regulators

Premium Solid Brass Construction:Crafted from high-quality solid brass, this propane adapter boasts exceptional corrosion resistance and long-lasting durability. The heavy-duty build ensures safe usage even in harsh outdoor conditions, providing reliable performance for years to come. It features a leak-proof design that guarantees airtight connections, eliminating the risk of propane leakage
Fill Slowly: Here’s How to Spot the Vapor Signal
When filling a propane tank, the vapor signal is a visible white mist or vapor that escapes from the fixed liquid level gauge. This indicates the tank’s internal venting process, which occurs as vapor pressure is released while the liquid level stays below approximately 80 percent of the tank’s capacity. The white vapor is a normal part of venting; the hissing sound and white discharge confirm that the tank is not yet full and that venting is functioning properly. A steady fill rate is also crucial for safely monitoring the venting process, much like maintaining a consistent connection during a car starter jump start. For homeowners who also rely on backup power, understanding reliable venting is similar to ensuring their top standby generators with transfer switches are correctly installed and maintained. This process relies on a regulated voltage supply to control the fill safely, much like an AGM battery charger maintains precise power delivery.
To ensure safety and compliance, keep your fill rate steady and slow. Doing so allows you to observe the vapor signal closely near the 80 percent mark, giving you precise control to avoid overfilling. As long as you see continuous vapor escaping, it’s safe to continue filling. However, when you begin to see liquid spray instead of vapor, stop immediately. The appearance of liquid indicates you’ve reached the legal fill limit, which is set to accommodate thermal expansion and prevent overfilling. Trust this vapor signal as your primary safety indicator—it’s designed to protect both you and the tank.
What to Do if You Don’t See a Vapor Signal
If you don’t see a vapor signal from the 80% fixed liquid level valve, stop filling immediately. Overfilling becomes a serious risk when the indicator isn’t working properly. First, verify that your setup is correct: keep the cylinder upright, ensure the 80% valve is open, and check all hose connections. If the vapor signal still does not appear, treat the tank as unsafe and do not continue normal filling operations.
Next, inspect the tank and perform valve troubleshooting. A missing vapor stream often indicates a stuck, closed, or malfunctioning valve, rather than a full tank. Look for blockages or damaged parts and correct any issues before attempting to refill. If you suspect the valve is faulty, do not attempt to repair it yourself; instead, refer the tank to a qualified service technician. In the same way a generator requires safety checks before use, a propane tank demands thorough inspection before filling resumes.
Leak-Check Your Tank With Soapy Water
To confirm your tank is leak-free, perform a soap water test. Mix a solution with one part dish soap to three parts water—this creates an effective leak detector. Keep the cylinder valve closed and all appliance controls off before connecting everything. Slowly open the valve to pressurize the system, then generously apply the soap to the valve area, regulator connection, hose, and all fittings. If there is a leak, escaping gas will cause bubbles to form, even tiny ones. No bubbles indicate no leak. If you see bubbles, immediately close the valve, tighten the connection, and retest. After a passing test, rinse off the suds with clean water. Small leaks may not produce detectable odors but can still ignite and pose hazards.
Close Valves and Disconnect Without Spills
To disconnect valves and hoses without spills, start by turning off all appliance controls. This means shutting off grill burners or heater knobs first, which helps prevent gas from escaping through an open circuit. Next, fully close the cylinder valve by turning it clockwise with your hand—skip the wrench to avoid damaging the valve seals through over-tightening. After closing the valve, bleed any residual line pressure by briefly firing the appliance until the flame goes out. This step clears the hose of pressure before you detach anything. For generator owners who also use battery chargers, understanding AGM battery charging is similarly important for safe equipment care. To maintain your battery’s health, applying a maintenance charge periodically can prevent sulfation and extend its lifespan. Carefully unscrew the regulator or coupling. If it resists, do not force it; double-check that the valve is completely closed. Resistance often indicates remaining pressure. Once the fitting is loose, immediately cap the outlet to prevent moisture and debris from entering. This also allows you to inspect the regulator’s threads and O-ring for signs of wear or damage. If you ever need to dispose of old generator fuel, treat it as hazardous waste to avoid environmental harm. Properly closing the valve, bleeding residual pressure, and promptly capping the outlet are crucial steps to prevent spills and ensure safe disconnection.
Transport and Storage Tips for a Full Propane Tank
When transporting or storing a full propane tank, always keep the cylinder upright. This position keeps the pressure relief valve in contact with vapor rather than liquid, reducing the risk of a dangerous release. Secure the tank with straps in a well-ventilated area, such as an open truck bed, to prevent shifting during transit. Never leave a full tank in a closed vehicle, especially in warm weather, because heat buildup increases internal pressure and can cause leaks or rupture. For safe disposal, it is best to contact a certified propane dealer or recycling center that follows proper disposal guidelines for outdated or damaged tanks.
For storage, keep the tank outdoors on a non-combustible base and away from sources of ignition and direct sunlight. Temperatures above 120°F can cause pressure spikes, so protect the tank from extreme heat. Always store tanks upright, capped, and immobilized to prevent tipping or damage. Avoid storing them in garages, basements, or areas with heavy traffic where bumps or accidents could occur. Before transport or storage, inspect the tank thoroughly for any signs of damage or corrosion.