Want to build your own generator enclosure but aren’t sure where to start? Getting it right means understanding how to measure, frame, and weatherproof it for safe, quiet, and reliable operation.
By the end of this guide, you’ll know the key steps to create an enclosure that protects your generator from the elements, reduces noise, and ensures proper airflow. Keep reading for all the details.
Why You Need a Generator Enclosure (And What to Measure First)
To ensure a proper fit, measure your generator’s length, width, and height accurately before purchasing materials. Use a tape measure and consult the owner’s manual for specific clearance and airflow requirements. Record the dimensions carefully and plan the enclosure footprint accordingly. For smart power protection, consider consulting UPS battery backup reviews to compare performance and quality standards for similar backup equipment. Note the location of access points such as the oil dipstick, control panel, and air filter; this will help you design convenient maintenance access. Also, account for space around the unit to accommodate cords, fuel lines, and ventilation needs. Avoid a cramped layout to make future inspections and repairs easier and safer. Accurate measurements now will prevent costly adjustments later. For fuel storage, review top propane tanks to ensure quality and performance when selecting a backup fuel source. For campers, choosing a portable generator model with reliable power output can simplify sizing your enclosure.
Picking the Right Materials for Your Generator Enclosure
Galvanized steel, aluminum, stainless steel, and coated panels each have their advantages for generator enclosures. Galvanized steel offers excellent durability and weatherproofing, making it a solid choice for long-term use in various environments. Aluminum provides a lighter shell that resists rust, which is especially useful if weight is a concern or for easier handling. Marine-grade 316 stainless steel stands out in coastal zones, thanks to its superior corrosion resistance against saltwater and humidity. Powder-coated aluminum combines the benefits of corrosion resistance and aesthetic appeal, with the coating helping it withstand fading over time. Before finalizing your material selection, you should also compare the top inverter options to ensure your enclosure accommodates the specific dimensions and cooling needs of your chosen portable generator model.
When considering fire safety, stainless steel remains non-combustible, providing an added layer of security. Mineral wool insulation meets UL 94 HF1 standards for fire resistance, ensuring it won’t ignite easily. For noise reduction, layering mass-loaded vinyl with medium-density fiberboard is effective at blocking sound transmission. Plywood can be used but is less dense and less effective as a sound barrier. Coated panels or concrete blocks enhance weatherproofing, though their heavier weight requires you to be ready for more lifting and securing. Balancing these material choices depends on your site’s exposure, weight limits, climate, and your comfort level with handling heavier or more complex assemblies.

IP66 AND NEMA 4X WEATHER PROTECTION - A one-piece molded gasket and precision door lip keep rain, snow, dust and UV out. Rated IP66 for powerful water jets and NEMA 4X for corrosion resistance indoors and outdoors.

Heavy-Duty Outdoor Generator Enclosure: Our metal generator box is made from high-quality metal and designed to withstand everyday outdoor exposure to rain, snow, and sunlight. Designed for outdoor use, it helps protect your portable generator while providing a secure, enclosed storage solution

Designed to fit generators up to 30"x22"x24", this heavy-duty generator box provides a snug and secure housing. The reinforced steel construction prevents accidental damage, ensuring your power source stays rest assured during outdoor storage
How to Size Your Generator Enclosure for Airflow and Access
To properly size your generator enclosure for airflow and access, ensure there is at least 5 feet of open space around the unit. This clearance allows for sufficient combustion air intake and radiator fan inflow, preventing hot discharge air from recirculating back into the intake. Maintaining this space helps your generator operate efficiently and reduces the risk of overheating.
For maintenance access, allocate a minimum of 3 feet of working space at the front and sides of the enclosure. This gives you enough room for inspection, repairs, and routine servicing without feeling cramped. Additionally, make sure doorways are at least 36 inches wide to accommodate the generator and tools comfortably. Fully opening all hinged doors without obstructions is essential for smooth access.
Before finalizing your enclosure dimensions, measure the entire footprint of the generator, including the radiator and alternator. This ensures your enclosure provides adequate space for both cooling and maintenance, preventing any tight fits or airflow restrictions. Planning these clearances now saves time and effort during later servicing.
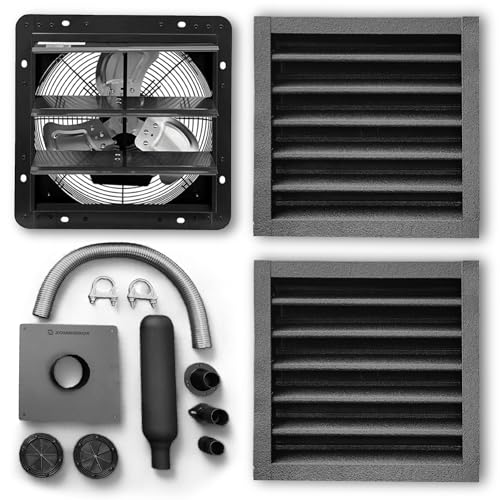
COMPLETE CLIMATE CONTROL SYSTEM: The all-in-one solution for building or upgrading your DIY generator enclosure. This comprehensive kit solves the two biggest problems with outdoor generator sheds: overheating and carbon monoxide buildup. Includes active cooling, passive intake, safe exhaust routing, and cable management

【Exhaust Odors Smoke and Dust】- Effectively discharge smoke or odor inside the 3D printer protective cover, allowing you to enjoy the process of creating 3D printing works more

Generator Exhaust Ventilation Control System: Generator exhaust vent kit is a comprehensive kit for building or upgrading generator sheds, solving problems such as excessively high generator shed temperatures and the inability to expel harmful gases. It keeps the generator shed cool and completely removes harmful gases, preventing their accumulation
Where to Place Intake and Exhaust Vents on a Generator Enclosure?
Place intake vents low on the enclosure’s coolest side, typically the north or east wall, to pull in denser, cooler air. Position exhaust vents high on the opposite wall to expel hot air effectively. This arrangement creates a natural cross-draft that optimizes airflow across the entire generator. Ensure intake vents are sheltered from direct sunlight, exterior heat sources, or other warm equipment to prevent preheating the incoming air. Never place intake and exhaust vents on the same wall, as this causes recirculation of fresh air and hampers cooling. Keep intake openings on the side opposite the main heat source of the generator to promote a full enclosure sweep. Following this placement strategy ensures efficient heat removal and consistent airflow, protecting your generator from overheating. Deep cycle battery testing and maintenance principles can also help ensure your generator’s battery operates reliably in this enclosure, and selecting the best deep cycle battery for your camper will further enhance overall system performance.

WATERPROOF & BREATHABLE – IP68-rated air vent plug allows moisture vapor to escape while blocking water and dust from entering your enclosure.

🏆 Built Like a Tank: Heavy-Duty All-Weather Protection Protect your investment with our heavy-duty galvanized steel casing. Unlike flimsy covers, this enclosure is built for permanent outdoor use. The rust-resistant powder coating stands up to rain, snow, and blazing sun, while the thick soundproof foam lining turns your loud generator into a quiet hum—keeping the peace with your neighbors.

Compatible Sizes: Fits PVC pipes with inner diameter (ID) 2.07 inches to 2.37 inches. To find the right size: First, measure the inside opening of your pipe (where the cover inserts). Second, match it to a cover labeled for that inner diameter (ID)——If the size is not suitable, you can fix it with screws
Building the Frame and Panels: A Step-by-Step Breakdown
To build a sturdy frame and panels for your generator enclosure, start by measuring the generator’s length, width, and height. Add approximately 3 inches of clearance on all sides to ensure adequate airflow and space for assembly. Construct the base using pressure-treated 2x4s, securing the corners with screws for a strong foundation. Place vertical studs at each corner to form the wall skeleton. Before finalizing the frame, check for squareness by measuring the diagonals—if they match, your frame is true; if not, adjust until they do. Use a carpenter’s square or a level during assembly to maintain right angles and consistent alignment.
For the panels, cut plywood to match each side of the frame. Opt for exterior-grade plywood, which offers better moisture resistance for outdoor use. Attach the panels directly to the frame using deck screws, spacing them at regular intervals for stability. Stagger panel seams at the corners to prevent weak points that could compromise the enclosure’s integrity. If designing a door, reinforce the opening with additional lumber to support hinges, and install corner brackets to preserve right angles. For longer spans, include cross-bracing to reduce flex and maintain structural rigidity. Finally, secure the entire enclosure firmly to the base to prevent movement caused by wind or vibrations.

DAP plastic wood filler looks and acts like real wood; ideal for corners and vertical surfaces on interior or exterior wood

Waterproof Interior & Exterior Wall Panels: Upgrade any space with 100% waterproof WPC slat wall panels designed for both indoor and outdoor use. Ideal for exterior wall panels, facade cladding, accent walls, and commercial applications.

LASERABLE & MACHINABLE - Laser safe phenolic plywood for vector cutting and engraving. Machinable Plywood for your CNC router. 1/2” Plywood can be cut, shaped and finished with any woodworking tool.
Weatherproofing Tricks: Sloped Roofs, Flashing, and Drainage
To weatherproof your generator enclosure effectively, start with a roof pitched between 20° and 30°. This slope helps rain and snow slide off quickly, preventing water buildup. Beneath the roof decking, install insulation to reduce condensation and enhance thermal performance, keeping your generator dry and functioning efficiently.
Secure all roof panels with hurricane clips and heavy-duty fasteners to withstand strong winds. For roof-wall intersections, use step flashing with each piece overlapping downslope, directing water away from the enclosure. Add kick-out flashing at the lower edge to channel runoff away from the wall surface. Rely on layered overlaps rather than just sealant, as this provides a more reliable barrier against leaks. For the most reliable connection between the enclosure and your generator, consider pairing this setup with one of the reviewed top transfer switches to ensure safe power routing. However, if you plan to store fuel for the generator, remember that kerosene in a gas can is unsafe due to incompatible materials and vapor risks. For monitoring fuel levels, you can use a propane tank with gauge to easily check remaining supply and ensure uninterrupted operation.
Design the roof to direct water into a clear drainage path. Slightly slope the base frame and include low-point drains to prevent pooling around the enclosure. Check that runoff flows away from the structure and does not backtrack. Ensure no flat spots collect water and verify flashing overlaps are installed correctly before completing the weatherproofing.
Soundproofing That Won’t Block Airflow or Trap Heat
Adding mid-density acoustic insulation like mineral wool behind perforated metal panels effectively reduces noise without blocking airflow. This type of insulation absorbs sound vibrations, preventing them from bouncing around your enclosure, yet it doesn’t restrict air movement. Avoid sealing the panels completely, as trapping heat becomes a risk and can lead to overheating. Maintain at least 18 inches of internal clearance to help dissipate heat and prevent hot spots. When selecting vents, match their size to your generator’s CFM (cubic feet per minute) specifications to ensure proper airflow. For larger generators, consider installing a powered fan to boost ventilation. When powering sensitive electronics, you should also consider a pure sine wave inverter as it provides cleaner power output for your equipment. This balanced approach cuts down noise levels while keeping your generator cool and functioning efficiently. Just as you would check propane regulator adjustment to maintain safe fuel pressure, you should verify your generator’s gas connections for leaks and secure fittings. If you later connect this enclosure to your home’s power system, remember that a manual transfer switch must be installed to isolate your generator from the utility grid safely.

Soundproofing That Works: rock wool insulation soundproofing at 2 inch absorbs mid to high frequency noise, reducing echo and sound transfer in Recording Studio, Home Theater, Ceiling, DIY Acoustic Treatment

Designed for Sound Absorption Echo Control: the dense, porous stone wool structure helps absorb sound energy and reduce unwanted reflections, echo, and reverberation; Ideal for improving room acoustics and creating a cleaner, more controlled listening and recording environment; Sound absorption performance varies by thickness, installation method, and frequency

6lb/ft^3 Rockwool ProRox SL960 Mineral Wool - 3 sheets of strong, rigid stone wool insulation
Test Your Generator Enclosure Under Load Before Using It
Performing a full load test on your enclosure before an actual outage is essential to ensure it can handle the stress without compromising generator performance. Begin by verifying all pre-start checks: confirm that oil, coolant, fuel levels, batteries, and air filters are in good condition. Secure all panels and doors to prevent any debris or obstacles during testing. Establish a safe perimeter around the testing area using signage and PPE to protect personnel and prevent accidental entry. Additionally, ensure your trickle charger maintains the battery at full charge during testing to prevent starting failures.
Warm up the generator to operating temperature before applying load. Apply the load gradually in steps, monitoring key parameters such as voltage, frequency, oil pressure, and temperature at each stage. Pay close attention to voltage dips, smoke emissions, or nuisance trips, which can indicate underlying issues. If the building load is insufficient for a comprehensive test, use a load bank to simulate the required demand accurately. Selecting a charger with higher charging efficiency ensures the battery remains robust throughout prolonged testing cycles.
Most standards recommend running the generator under at least 30 percent of its rated load for a minimum of 30 minutes, while acceptance testing may require maintaining 80 to 110 percent load for a similar period. Observe how enclosure louvers respond to rising temperatures, ensuring they open properly to prevent overheating. Check for hot spots, rattling panels, or airflow obstructions that could hamper cooling. After completing the test, allow the generator to cool under a light load, then inspect the enclosure and generator components for leaks, damage, or abnormal wear. Consider installing a whole house surge protector to safeguard the generator and connected equipment from voltage spikes caused by load switching or external power disturbances. Address any issues found before deploying the system during an actual outage.